Showing posts with label Christmas. Show all posts

Sunday, 4 November 2018

Shay - DD 2018 Kit - The December Daily Decision Part 1


Hello everyone!

Well December is nearly upon us and I am still wondering where did 2018 go!

I must say the decision to do DD was not one I was going for willingly, I resisted, I debated, I cried...I doubted my ability to do it.....but here I am.  Enna from My Scrapbook Room and Raelene (the lovely owner here) challenge me to take part in the DD and Raelene decided putting me on the Design team would be a fun element to it! So here I am 2018 DD novice and Design team member for the Fabulous Scrapping Fun kits. This is my journey!

About 2 months ago back in early late September Early October was chatting to Raelene about the DD kits she was releasing and all the exciting stuff that was in there, she couldn't convince me to take part but loved the kit anyway!  Fast forward a few hours later and a question over on My Scrapbook Room on who was doing it saw me saying no not doing it never done one, too hard, all the reasons as to why the biggest being we are not into Christmas here much! So Between being challenged by Raelene and Enna I am here.

I was excited at first because it meant I got to shop spend hours on Pinterest and pin layouts and designs and ideas....and I mean hours of Pinterest which normally ended  up me somewhere where I shouldn't of been instead of in pinning stuff for DD. Fast forward 10 scrapbooking sites later stalking the DD queen (Ali Edwards) to see what she had in her kits, should I buy one yes no, in the cart walked off come back emptied cart, back again in cart and out of cart.  This was the case with a lot of the site I just couldn't decide this was a huge undertaking and the fear of getting it wrong was clouding what i wanted to buy. Being an indecisive scrapper didn't help! (that is another post for another day) It also didn't sit well with me that I had other stuff happening in December that was defiantly not Christmas related and how was I going to put that in my album when it wasn't Christmas related!

IN the meantime Raelene had sent me the Scrapping Fun kits  DD embellishment kit
                                                              

Which gave me an idea of what was in the kit and what other colours I could use with them.  After a long painful search (keep in mind I totally forgot I already had a shop full of Christmas stuff that i forgot to check and see what i already had 😒)  I settled on My Mind Eye Joyus collection....ohh guess who remembered she had stuff already for Christmas after she purchased the collection and it had arrived yep me....and guess what?  I ALREADY HAD SOME OF THE JOYUS COLLECTION IN THERE!!  😔 Oh well will have spares just in case.

This brought me forward to the day I had to sit down and make some decisions on what I was going to put in my kit...Yep the struggle was real people, Did I still want to use the Joyus collection?, what about the two paper pads and the two 5 packs of washi I had brought from Spotlight as well, Ohh! die cuts from three different companies none matching my papers or kits..... Come back to the basics that is what I had to do.  I walked away from it all for a few days to clear my head and come back to it.


PHOTOGRAPHS - I am a huge shutterbug and love taking photo's especially at Christmas time. In my search for DD ideas I came across some lists for taking photo's for December Daily, though most of them were based in America and where it snowed I took some from about 12 different list and threw in a few of my own. A good starting point. Here is the list I came up with.


PHOTOGRAPHY PROMPTS FOR CHRISTMAS
  1. Favorite Christmas Tree Decoration
  2. Christmas cards ready to post 
  3. Presents under the tree
  4. Decorating the Christmas tree
  5. Opening Presents
  6. Looking through the glass (shop window displays)
  7. Light bokeh
  8. Friends
  9. Special Event
  10. Wearing Santa's hat
  11. Christmas wish list 
  12. Something Red
  13. Travel
  14. Close up of ornaments on the tree
  15. Christmas Lunch
  16. Footprints in the sand
  17. Christmas craft
  18. Boxing Day Activities
  19. Christmas past
  20. Tinsel 
  21. Cheers
This was the launching pad of what my pages will be about in my DD. This I will save for another post.

Saturday, 27 October 2018

Amy- October 2018 Kit - ' Our Little Elf'

Hello Scrapping Fun Friends,

We are nearly at the end of October, can you believe it? The year has certainly rushed by it feels and I am beginning to see the signs of Christmas 2018 around the place. So today I am bringing you a Christmas inspired layout from last year; a very cheeky photo of my niece wearing a Santa hat in the November 2017.

I have used a cut file from the Silhouette store and 2 of the papers from the October 2018 kit to back part of the file, the green paper is from my stash. I have also used some of the papers to also create layers behind my photo, I made this a mix of the bright and colourful and flatter papers to give the photo some lift of the white card stock background.


I have then used the beautiful Christmas embellishments from the kit to spread some Christmas cheer and fun around my layout, starting with the large tulle silver flower, then adding the smaller green flowers and then adding some of the gorgeous red blings.


From my stash I pulled in some little journal pieces to add a few extra touches to complete this layout.
 I have a bonus to this post today and have a process video to share as wiel over on my channel so be sure to click on the link below and check it out.
https://youtu.be/E8ZyVrPCzto

See you next month

Amy xx

Saturday, 13 October 2018

Lauren - October 2018 Kit - DIY Charms for December Daily album


Hello everyone,

The day after I unboxed my October 2018 kit, I was shopping in a fabric shop and found this lovely long tassel with bead at the top and new that would be great as a start to charm embellishment cluster for my 2017 December Daily Album that I need to complete.  I wanted to add some of the goodies from the kit to bulk out the charm cluster, not just have the tassel by itself.

I started with the price tag from the tassel, I added the lovely wide washi tape to both sides and one of the felt flowers as a 3D goodness. I had also purchased some gold bells and threaded them onto the tag. It already had its own string so that part was sorted.


Next I punched a hole in the felt Santa hat, threaded some red and white bakers twine in the kit through it. However the felt wasn't strong enough to have a hole and thread through it so I had to rethink that - and boy did that take me a little time to work out how to use the Santa hat as charm but in way that suited long term use.

While fiddling around I worked out that I could punch a circle out of the text paper and back it with white circle, place the Santa hat and thread on top by using wet glue. I then added two red bling and small alphas that spelt 2017. Added a dotted line border and was happy.

I was then holding up the three charms, the tag, the tassel and the Santa hat circle to see how they looked together and trying to make the green pom pom trim work. It was then that I wondered if I could include the homemade tulle flower and as they hung next to each other I decided that the Santa hat circle looked good backed by the tulle flower!  I made that happen and so delighted with how it looks.

So I then used red and white bakers twine in the kit to loop on the charms and then tied in a double knot as a loop. I then looped it through the rings in the 8x8 album that I using as 2017 December Daily album.


Thanks for checkout out my post,
Lauren


Wednesday, 10 October 2018

Amy- October 2018 Kit- Family Tradition

Hey there Scrapping Fun Peeps,

October is here and we are on the roll to Christmas... eek! But how gorgeous was this Month's kit as a nice little reminder of the coming festive season. I did decide that for my first project using this kit I would catch up on some older family Christmas photos that are sitting in my photo box. This photo is going back to 2016, and we have kind of created this tradition of Santa photo on Christmas Eve.

For this this layout I decided to bring in some of the background colour and bling of the photo, so using the packaging technique and the Tumbled Glass Distress Oxide I smooshed the ink all over the background. I then splatters of gold colour shine would be the perfect touch.


I have then pulled a piece of patterned paper from my stash to add to this layout (I think it is an old My Minds Eye Christmas one). I used it to break up the page a little and a different paper layer to behind the photo. I have then used the silver doily and the sign post card to create a larger cluster and journaling space next to my photo.


After this I have added my photo and then the green trim from the kit would add the perfect pop of colour to break away from the red and some texture to the page. To balance out the large cluster I thought I would use the papers from the kit and make a smaller type cluster in the bottom right. I have torn the edges of the pieces to give them that rough book kind of look, as if you were looking at a story. 

Then using some of the smaller embellishment pieces I embellished little spots on my page and then added my title and date using gold number stickers. 
And that is my layout done! 


I am loving this layout and how easily this kit is to use with previous Christmas stash as well as other things in my collections. 

Until next time
Amy 


Saturday, 6 October 2018

Jaymilee - October 2018 Kit - 6x6 Christmas mini album

Hello lovely ladies, I’m up on the blog today sharing my first project using the October 2018 kit. For this first project I wanted to make a really simple Christmas album because I’m not doing December daily this year, but I still want a simple way to document my Christmas memories. I grabbed two 12x12 kraft cardstock sheets, two 12x12 white cardstock sheets and a few random green papers from my stash. I then cut down all the paper so they were all 6x6. I just arranged them in any order, but I knew I wanted kraft to be the first page.


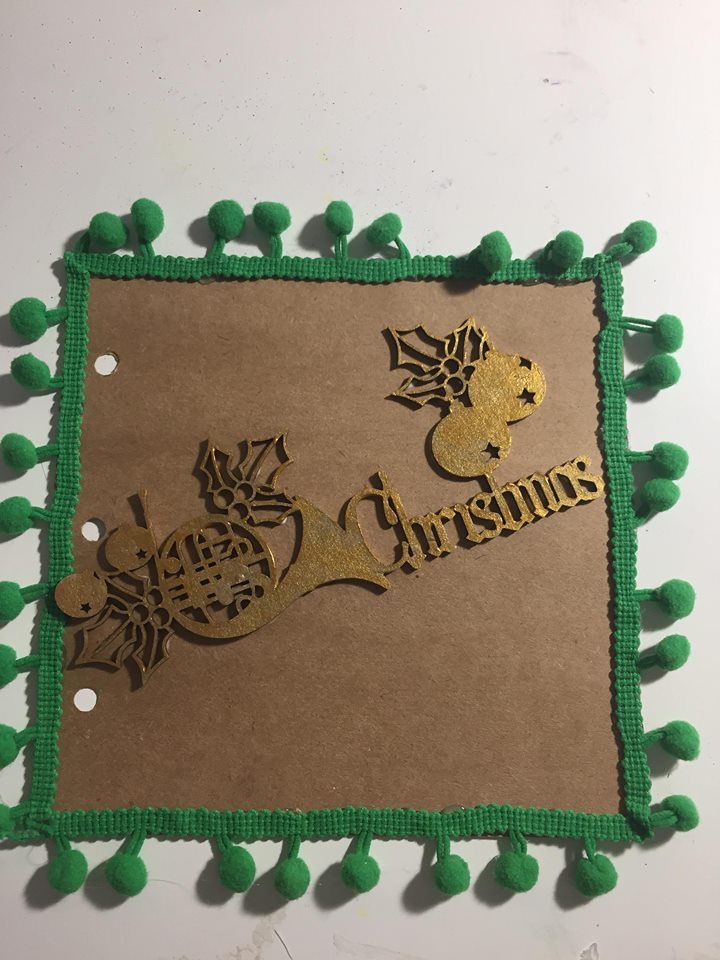
Next I used my hot glue gun to glue down the green pompom trim from the kit around the front cover of the mini album. This took a little bit of time but using a hot glue gun makes it so much easier then standard wet glue.


Next I took the chipboard Christmas word from the kit and painted it gold. This took a few coats but because they were very thin it dried very quickly. Painting chipboard or wood veneer can add a really nice textural element in a paper craft project. I then glued it down onto the front cover using wet glue.


I took the silver flower from the kit and hot glued that onto the middle binder ring of the mini album. I then took the red twine from the kit and tied little bows on the top and bottom binder rings. Adding different trims and ribbons to binder rings on mini albums can really add a little bit of softness to the metal binder rings.


Next I just went a little embellishment crazy over the cover. I hot glued the green fabric flowers from the kit on top of the green pompom trim. I also used the hot glue gun again to put the adorable little Santa hat on the top right corner of the album cover. I put a label from my stash and stamped on the December 2018. Finally I put some white splatters all over the page.

I’m really excited to fill this mini album with all the Christmas memories this year. I’m also so happy with how this mini album cover turned out, I haven’t made a mini album not in binder in 5 years so this was really fun to make. Go check out some of the other ladies projects using the October embellishmentkit.

Thanks everyone bye.


Sunday, 10 December 2017

Sarah - DD Kit- Fiesta Fun!

Hello crafty friends, Sarah here with another Documenting December layout for you. Isn't the silly season upon us already?! I started writing this while travelling in the car to a work conference (until I got car sick!) and am finishing it off on Saturday morning - that's multi tasking for you! I'm trying to use my time as effectively as possible when ever I can. It just seems this time of year has less hours in the day perhaps!?!

This layout forms part of the 6x8 album of my 2016 Documenting December album - here's hoping I can get it done before Christmas this year, though it's coming up fast.

i have used a piece of patterned paper to create a large pocket across the bottom of the page. Washi tape across the top of this pocket and a photo of my boys matted on a pocket card layered on top of the pocket. Before I placed anything in the pocket, I added some paint to the top of the base page. I applied this Dylusions paints using my fingers, then once dried, stamped the word FIESTA on to it.
The FIESTA is an annual get together we have with close friends to celebrate Christmas. We all bring and shre food - hence the name, fiesta! I layered a tag, cut apart and photos within the pocket. This enabled me to still see all of these feaures with the option of hiding them in the pocket if I wanted to. The layout was completed using the gorgeous hand made flower from the Documenting December kit, some enamel dots from my stash and the number 17 from the kit - representing the 17 December when this event occured.
If you haven't already gotten your Documenting December kit, head to the Subscription Tab and fill in the form.

Friday, 8 December 2017

Christmas 2017 YouTube Hop - Childhood Christmas Memories


Scrapping Fun Kits is proud to be one of the five sponsors of the Christmas 2017 YouTube Hop and I (Raelene) am happily participating in this Hop with these lovely ladies.

The prize for this Hop's Prize Draw is a DD Kit.

To enter watch each video in the Hop and leave a commenton each video.


Here is the Hop order, start anywhere you like.
Suzanne
Raelene
Lauren WK
Katie 

Amy
Lauren H
Chrissi
Silvia
Morgyn

So now for my layout.

I wanted to Alter a Little Golden Book to use for recording my Childhood Christmas Memories.

The DD Kit was perfect for decorating the cover.
Those resin deer are super cute.

Head to my video and check out how I created this and how I Google is helping me record my memories.


Good luck to everyone who enters.

Wednesday, 6 December 2017

Morgyn ~ December Daily ~ Making the numbers


 Hi everyone,

I'm back with a little project for my December Daily.  This time I am sharing how I created my little number clusters.

I knew I didn't want to just stick the number on the page, that they needed a little bit of oomph so I decided to make some little clusters using pieces from the kit (which you can get here) and some bits and pieces from my stash.


Here I am using a piece of pattern paper from the kit, which I punched out using small tag, square and ticket punches.  I used these to created the base for my clusters.  Then I trimmed down some die-cuts from an old Kaisercraft 6x6 paper pad and add them to the base pieces.  Next I adhered my numbers to the top.


For this little one I used another die-cut from a Kaisercraft paper pad, it's meant to be an arrow but I thought it looked a little like a Santa Cottage.  I added some of the kit washi tape to the bottom and then the red number 2 on top.

I continued with similar combinations until I got to number 25, using pieces from my stash, some from the kit and couple of new bits and bobs.  I really loved how they turned out and can't wait to get them in my December Daily journal.  Here is a snapshot of my final 25 pieces.


I do have a process video up on my channel I would love for you to check it out, you can find it here. Also don't forget to grab yourself a kit to create your own December project.

Thank you
Morgyn  xx

Sunday, 26 November 2017

Alicia - DD Kit - Documenting December Preparation

Alicia one of our Scrapping Fun Fans/Guest Designer sent me these photos of her DD preparation a a while ago and has given me permission to share them with you.

I love seeing all her goodies spread out in this photo.  In addition to the DD kit Alicia is using the Exclusive Christmas Kit from 2016 that prompted me starting Scrapping Fun Kits.

I love the cluster she has created on the red polka dot bag from the kit.
She has used part of one of the gold doilies, a epoxy flair and a tag from the DD kit in addition to the bag.


 I love the cute way she added the Christmas Bells from the DD kit to the felt Santa Letter envelope and added the envelope in as a insert.
Such a fun way to use the punchinella.


I love that Alicia found alternate ways to use things such as this bit from the beaded trim being used as a tab.


Such a lovely cluster using a silver doily, and a journal card from the DD kit with a flower from the Exclusive Christmas Kit from 2016. 
I love how she used part of the beaded trim to make a page marker.
And the cute shaker pocket that has the tiny resin candy canes in.
Twine helps this kraft insert pop.  Simple but effective.


Thank you Alicia for letting me share what you have created so far with our DD Kit.

What have you created with your DD Kit?

If you would love one of these kits we still have a few left so why not head to the Subscription Tab and order one.


Tuesday, 21 November 2017

Sarah - DD Kit - Stay Cool

Hello crafty friends, Sarah here with the very cool November embellishment kit. Based on an Australia feel, this kit is once of my favs! I completed two layouts for you using this kit, and have heaps of content left over for other pages in my Documenting December album. These photos were from Christmas Eve at Lakes Entrance. We were away for Christmas and hit the beach nice and early in the day.

I love the patterned paper in this kit (I just adore circles, dots and spots!) and the cut aparts were great too - the 'stay cool' and green banner on the bottom left corner are always handy. The most favorite part of the kit however is the surfing santa ribbon - you'd have to agree it is just so cute! The silver charm prawn is also adorable and totally us! Let's take a closer look;
The chipboard from Memorymaze Lasercuts was custom designed for this kit - Christmas is all about family. I covered this piece with black ink and covered with clear embossing powder. I heated it and love the shiny, textured finish of the title.
I also completed a second layout for my album, also taken on Christmas Eve. This is of my youngest son looking out of the caravan window waiting for Santa to arrive. Whilst it was still early in the evening, he was eagerly awaiting for this special event.
The chipboard 'Christmas Eve' on this layout was again from Memorymaze Lasercuts and inked with Stampin Up's blue lagoon ink and clear embossed. Whilst you cannot see the true ink colour on the layout, this was picking up on the blues in the coloured paper photo mat.This chipboard is from the Scrapping Fun Kits Documenting December kit. The photo mat paper is from the November embellishment kit. Let's take a look at the other embellishments in this kit - the 'merry' flair and coloured candy cane buttons are just adorable.
All of the base pages for the layouts in my Documenting December album are from Close to my Heart. I hope you enjoyed this post and be sure to check out the November embellishment kit whilst stock lasts! Until next time....

Sunday, 19 November 2017

Morgyn - DD Kit - Making my Documenting December Notebook

Hi Scrappers, 

Hope you are all getting ready for the Christmas season, I know I am!!  December 1st just can't come quick enough, to put up the tree and decorations :)

Here is a little walk through of how I put together my Travellers Notebook style album.  If you would like to watch my more in depth process video on how I made this you can check it out here.


First off I cut down some 12x12 pieces of cardstock (all from different collections) to 6x12.  I used a bone folder to put a crease down the middle of each and arranged them together to form the book.


Next I put some clips on the edges of the book to keep it in place while I stitched it together.  First I marked in 1 inch spaces along the middle then pre punched the holes with a needle.  Then using some black cotton (doubled over) I stitched up the middle front and back to make it nice and strong.


Once it was all held together nicely I cut a 1/2 inch strip off the open side so my notebook will be 6x5.5 inches in size.  I made it as big as possible knowing I could cut it down further if i found it  was too large.


Adding the finishing touches;  I cut down this piece of patterned paper from an old Stampin' Up! collection and adhered it to the front cover.

I used some grey paint to paint my chipboard 'December 2017'.  Once that was dry I used some silver stickles to a bit of glitter. Sadly I was a little heavy handed and broke my wood piece - it glued back together just fine :)


Lastly I used a strip of washi tape to finish off the edge and glued my wood piece down and added one of the holly leaves to the top corner.  I might add a few more pieces as I complete my pages, but for now I am calling in done.


Thanks for stopping by

Morgyn xx

Saturday, 18 November 2017

Lauren - November Kit - Elf

Welcome back readers!

When I sat down to create again with the lovely Christmas inspired November Embellishment Kit I was inspired by the goodies and my choice of printed photos to make a project life layout.

I dug dig into my stash of different type of project life page protectors to get the 6 vertical 4x6 pockets page protector.

My son had chosen some of his favourite antics that Zac the elf had done last Christmas (2016), and these were the four photos I used.

I started by cutting two 4x6 cards out of the patterned paper, using the tree and the mistletoe pattern papers for those two cards. I then got started on individually embellishing each card/photo.


First Card - I used a cut-a-part label with the words Stay Cool, added a candy cane button and a label for journaling (label from stash)


Poor Zac the Elf!


Second card - Filler Card.
Used the mistletoe patterned paper for the base, added the 3x4 filler card, the tree paperclip, a label from cut apart sheet, washi and stickers from the Aussie plant sticker sheet.


Third Card - Back to a photo.
Kept it simple with the other half of the label from previous card, a strip of washi, one of the handmade flair, added a puffy heart (from my stash).

Cheeky Zac eating our lollies!!


Another Filler Card - using the tree patterned paper as background, using a oval frame sticker to start. Added the beautiful handmade flower and layered some flower stickers behind that lovely 3D paper flower.
Used a cut-a-part word that I added a banner to and used pink sharpie to outline the word to make it stand out more, and added the rest of the title (handwritten).


Zac hiding in the tree with a new Christmas video for us!.
Added washi to a piece of white cardstock so that can be placed on top of the photo (and not be totally transparent) - topped it with a beautiful handmade flair. To draw your eye to bottom of the photo added the lovely exclusive chipboard title - kept it natural to make it stand out on this photo.


To round out the layout, I started with the word cut-a-part - added fish tail banner on each end of it. Layering it on the ornament patterned paper and attaching to bottom of the photo with tiny attacher. The candy cane button gave that embellishment cluster some more interest. Finishing the photo off with the corner sticker from Aussie flower sticker sheet.


Zac thought he would cook some smarties for us HAHAHAHA !!


With Four embellished photos and two filler cards the project life spread was completed. Love the Aussie Christmas look of this layout.

Thank you for visiting, remember to check out the other blog posts and related videos of the design team. Get your hands on the kits to enjoy great embellishments that jazz up any scrapbooking creation you make.

Lauren