Showing posts with label Christmas Kit. Show all posts

Saturday, 13 October 2018

Lauren - October 2018 Kit - DIY Charms for December Daily album


Hello everyone,

The day after I unboxed my October 2018 kit, I was shopping in a fabric shop and found this lovely long tassel with bead at the top and new that would be great as a start to charm embellishment cluster for my 2017 December Daily Album that I need to complete.  I wanted to add some of the goodies from the kit to bulk out the charm cluster, not just have the tassel by itself.

I started with the price tag from the tassel, I added the lovely wide washi tape to both sides and one of the felt flowers as a 3D goodness. I had also purchased some gold bells and threaded them onto the tag. It already had its own string so that part was sorted.


Next I punched a hole in the felt Santa hat, threaded some red and white bakers twine in the kit through it. However the felt wasn't strong enough to have a hole and thread through it so I had to rethink that - and boy did that take me a little time to work out how to use the Santa hat as charm but in way that suited long term use.

While fiddling around I worked out that I could punch a circle out of the text paper and back it with white circle, place the Santa hat and thread on top by using wet glue. I then added two red bling and small alphas that spelt 2017. Added a dotted line border and was happy.

I was then holding up the three charms, the tag, the tassel and the Santa hat circle to see how they looked together and trying to make the green pom pom trim work. It was then that I wondered if I could include the homemade tulle flower and as they hung next to each other I decided that the Santa hat circle looked good backed by the tulle flower!  I made that happen and so delighted with how it looks.

So I then used red and white bakers twine in the kit to loop on the charms and then tied in a double knot as a loop. I then looped it through the rings in the 8x8 album that I using as 2017 December Daily album.


Thanks for checkout out my post,
Lauren


Wednesday, 10 October 2018

Amy- October 2018 Kit- Family Tradition

Hey there Scrapping Fun Peeps,

October is here and we are on the roll to Christmas... eek! But how gorgeous was this Month's kit as a nice little reminder of the coming festive season. I did decide that for my first project using this kit I would catch up on some older family Christmas photos that are sitting in my photo box. This photo is going back to 2016, and we have kind of created this tradition of Santa photo on Christmas Eve.

For this this layout I decided to bring in some of the background colour and bling of the photo, so using the packaging technique and the Tumbled Glass Distress Oxide I smooshed the ink all over the background. I then splatters of gold colour shine would be the perfect touch.


I have then pulled a piece of patterned paper from my stash to add to this layout (I think it is an old My Minds Eye Christmas one). I used it to break up the page a little and a different paper layer to behind the photo. I have then used the silver doily and the sign post card to create a larger cluster and journaling space next to my photo.


After this I have added my photo and then the green trim from the kit would add the perfect pop of colour to break away from the red and some texture to the page. To balance out the large cluster I thought I would use the papers from the kit and make a smaller type cluster in the bottom right. I have torn the edges of the pieces to give them that rough book kind of look, as if you were looking at a story. 

Then using some of the smaller embellishment pieces I embellished little spots on my page and then added my title and date using gold number stickers. 
And that is my layout done! 


I am loving this layout and how easily this kit is to use with previous Christmas stash as well as other things in my collections. 

Until next time
Amy 


Saturday, 6 October 2018

Jaymilee - October 2018 Kit - 6x6 Christmas mini album

Hello lovely ladies, I’m up on the blog today sharing my first project using the October 2018 kit. For this first project I wanted to make a really simple Christmas album because I’m not doing December daily this year, but I still want a simple way to document my Christmas memories. I grabbed two 12x12 kraft cardstock sheets, two 12x12 white cardstock sheets and a few random green papers from my stash. I then cut down all the paper so they were all 6x6. I just arranged them in any order, but I knew I wanted kraft to be the first page.


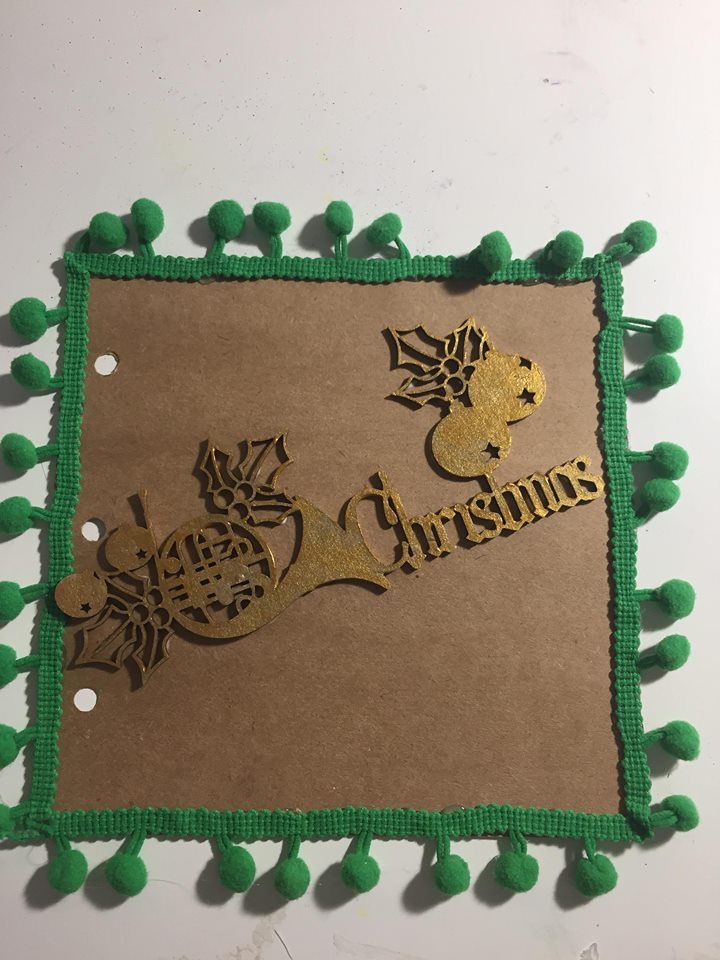
Next I used my hot glue gun to glue down the green pompom trim from the kit around the front cover of the mini album. This took a little bit of time but using a hot glue gun makes it so much easier then standard wet glue.


Next I took the chipboard Christmas word from the kit and painted it gold. This took a few coats but because they were very thin it dried very quickly. Painting chipboard or wood veneer can add a really nice textural element in a paper craft project. I then glued it down onto the front cover using wet glue.


I took the silver flower from the kit and hot glued that onto the middle binder ring of the mini album. I then took the red twine from the kit and tied little bows on the top and bottom binder rings. Adding different trims and ribbons to binder rings on mini albums can really add a little bit of softness to the metal binder rings.


Next I just went a little embellishment crazy over the cover. I hot glued the green fabric flowers from the kit on top of the green pompom trim. I also used the hot glue gun again to put the adorable little Santa hat on the top right corner of the album cover. I put a label from my stash and stamped on the December 2018. Finally I put some white splatters all over the page.

I’m really excited to fill this mini album with all the Christmas memories this year. I’m also so happy with how this mini album cover turned out, I haven’t made a mini album not in binder in 5 years so this was really fun to make. Go check out some of the other ladies projects using the October embellishmentkit.

Thanks everyone bye.


Sunday, 24 September 2017

Stand Alone DD Kit

Do you love to Document December?
Well this stand alone kit is something you may want to add to your shopping cart.

Packed with lots of fun and gorgeous Christmas Embellishments this kit has plenty of goodies in it to get your projects off to a good start this year.


We are excited to be including some fantastic wood veneer from Corbett Creations Wood Veneer and some wonderful chipboard from Memorymaze Lasercuts.  As well as many unique items such as 2 gorgeous resin deer, resin candle, felt Letter to Santa envelope, and so much more.


This kit is not included in the monthly subscription as it is much bigger, priced at just $35 plus postage it has over $50 of value packed inside.


Only 15 kits will be available for purchase so head to the Subscribe Tab and fill in the form or email me at scrappingfunkits@gmail.com and request a invoice for a kit so you don't miss out.

The Design Team and Guest Designer Alicia have been busy creating lots of lovely projects with this kit to inspire you.  Posts for the DD kit will be up on Sundays so make sure you check the blog each Sunday for fun projects.


Our DD kits will be released on October 15th, make sure you check out Morgyn's unboxing video on the 15th to see all the wonderful goodies in this kit.

Friday, 10 February 2017

Morgyn - Santa's Cottage


Hi everyone, 
Morgyn here with a layout using a Christmas kit created by the lovely Raelene.

 When first opened up my kit I had my son with me, he loved every bit of the kit and came up with a layout design for me while we were unboxing.  I thought this was a rather cute idea and decided to go with it.  It is definitely not my usual style or type of layout to create, but I had fun and master 5 absolutely loved it when I was finished - I guess that's what really counts, right??

Here is a picture of the kit I was working with


This is my completed layout


I did a bit of 'paper piecing' with this layout.  I started with my background layers, I used a few pieces from an old Stampin' Up! Christmas collection.  I used the blue/snow paper for the top 'sky' layer.  Then used the tree paper to create a forest look.  Lastly I used some white cardstock to create a couple of snowy mountains.


Next I worked on the Santa Cottage, I hand drew the outline of the house, then added some snow to the roof.  Then I started with my embellishments, I used the gems from the kit on my roof (as per master 5 request).  I just a straw to make the bottom of the window and some pearls for the sides.  Twine made a great house and door outline, along with a green door handle.  I had so much fun using all the little elements to create the Santa cottage.

After all the base layers were done, I added some stamping over the page to give the look of snow - I achieved this effect with white embossing powder and a circle stamp.  Then I added my photo along with a few more accent pieces - flower, snow heaps and some white glitter to the mountain tops gave a great effect.  

If you would like to see my process video for this layout you can find it here.

Thank you

Morgyn xx


Saturday, 28 January 2017

Tracey - Festive Feast

Today on the blog we have Design Team Member Tracey with fun layout using the Exclusive Christmas Kit.


I like to think that this layout is simple, yet effective. I started this layout off by trimming about half a centimetre off the sides so that I could back it on to some red card stock. I wanted to soften down the grid patterned paper so I spread on some white gesso and dried it with a heat gun.


I then used the gorgeous washi tapes that came in the kit and slightly layered them vertically across the page. I then chose my photos and layered them on top of card stock, vellum, and patterned paper. I didn't want the grid paper to show between the two photos so I used a scrap piece of patterned paper to lay horizontally across the layout.
I also used the red doily that came in the kit to use as a mount for my main embellishment cluster.


I sorted through my stash of Christmas die cuts and picked out a selection for this layout. I used the ‘Christmas Memories’ tag and added it to the left corner of the first photo, it still wasn't really standing out to me so I used the cute twine that came in the kit to layer and then make a bow to glue to the die cut. I clustered around the buttons and the beads, which were also included in the Christmas kit around the die cut.


I placed the Dec 25th up in the top right corner along with a scrap of the beautiful crochet doily that was included in the kit along with the button and the bead.


I placed ‘Treasured Moments’ on the second photo with a strip of the red rhinestones that the kit included.


I decided I wanted this layout to have some journaling, so I used ‘Our Christmas Day Story…’ as a title. I then added the journaling which reads ‘Our Christmas Day was a day filled with lots of love, laughter and happiness. The day began with all the presents and soon followed into lunch with Mum, Kevin, Adrian, Jaiden, Nan and Pop. As you can tell, Jaiden enjoyed his roast vegetables very much, so much that he was wearing it. A year to remember for sure’.


I then added the remaining beads either side of the title and then I added my main title, Festive Feast.

Tuesday, 24 January 2017

Tracey - Merry Moment

Today on the blog we have Design Team Member Tracey with another lovely monochromatic layout using the Exclusive Christmas Kit.
I decided on another monochromatic layout for this one as I saw that I had lots of red to use and a beautiful little felt bow from the December kit, which just happened to be red.


Loving simple mixed media layouts, I went for a red mist background and a large red doily which also came in the Christmas kit. I needed this to be a quick layout as I had my heart set on getting something done before Jaiden woke up, so I cut some chunky red strips from some Christmas scrap paper and stuck then down along with the doily. I also had my heart set on using my AdvantEdge fiskars punch with the notepad cartridge so I grabbed some old book paper, punched out a strip and glued that down with my chunky red strips.


I mounted my photo on some red card stock and mounted that with foam tape to my layout. I thought it still looked too plain so I had a quick hunt for some red lace cut two strips and glued them to the top left and bottom right corner. I then used the red rhinestones from the Christmas kit and stuck a small strip down next to the lace.


For my embellishment cluster, I glued down a scrap piece of the red bakers twine from the Christmas kit and used it as a ‘background’ for the red bow that I mentioned earlier. I glued down the bow so that it covered the corner of my photo. I then added layout some shine by gluing down some red sequins (also from the Christmas kit) and some of the red rhinestones round the twine bundle. I finished off the layout by adding my title, Merry Moments.

Such a Merry layout.

Monday, 23 January 2017

Tracey - Together

Today on the blog we have Design Team Member Tracey with another cute layout using the Exclusive Christmas Kit.


Sometimes less is more when it comes to scrapbooking. A monochromatic layout with sequins is what I had in mind when I first started mixing up a soft green gesso for my background. I applied the gesso with a large pallet knife to plain white card stock and then dried it with a heat gun. I then added more green to the gesso to make it a slightly darker shade and applied it over the dry gesso, making sure to leave patches of the paler green underneath, I then again dried with a heat gun.


I then started to layer my photo using vellum, plain and patterned card stock. With the first layer of vellum, I distressed the edges and inked them to make them stand out more, I then used mounting tape to stick it to another piece of vellum. Two more layers of plain and patterned card stock followed.

I had some pre-cut circles that I have been trying to use up for far too long so I grabbed two of them and stuck them under the photo along with a large white doily and the green punchinella from the Christmas Kit.


With the bottom left corner being such an interest point in the layout, I wanted to pull the eye up to the top right corner. To do this, I cut the beautiful little crochet doily from the Christmas Kit and glued it down. I then had some scraps of Christmas paper and cut a flag into them and stuck them on top. I still thought it needed something, so, I spread the buttons and the Christmas tree sequins from the Christmas Kit from the bottom left to the top right corners, I thought that this captured the eyes attention beautifully. I then chose ‘Together’ for the title as it's a photo of a close family members children all together.


Monochramatic Green is such a fun colour scheme to work with.

Sunday, 22 January 2017

Tracey - Christmas Joy

Our Design Team are playing with a Exclusive Christmas Kit and sharing their layouts so you can see examples of what to expect in our kits when then go on sale April 1st.

First we have Tracey sharing her Christmas Joy layout created with this fun kit.

I used to struggle scrapping all things to do with Christmas, red and green were just a huge challenge that I didn't want to undertake.  Now, I love Christmas scrapping because of Jaiden, this year was his first Christmas and I can't wait to share this layout with you all.


To start it off, I trimmed about 2cm from the sides of the white cardstock sothat  I could back it onto a patterned paper, I then mixed up the  red texture pase and applied that to the cardstock through a stencil.
Now, if your's patient enough you'll let the texture paste dry in it's own time, if you're lie me, you'll blast it dry with a heat gun.  After I had dried the texture paste I played around with some scraps to find how  I like my layering for under the photo, I stuck it down and then mounted the photo to a piece of vellum.
I used the doily as a mount for my embellishment cluster that includes these cute items from the Scrapping Fun Kits Design Team bonus Christmas kit.
Handmade Paper Poinsettias
Bakers Twine
Paper Straw
Metal Charms

After this, I cut the red Punchinella from the kit in half and glued each piece under the photo and cluster.
I finished off with adding my title and some more ink splatters.

The straws in this kit are perfect for Christmas layouts as the remind me of the North Pole pole.