Showing posts with label Jaymilee. Show all posts

Wednesday, 19 December 2018

Jaymilee - December 2018 Kit - Bloom where you are planted


Helloooo everybody, todays post is a little bit special and also a little bit sad. Today is my last blog post as a design team member for Scrapping Fun Kits. It has been a wonderful experience and I hope that you all have enjoyed seeing my projects as much as I have enjoyed creating them.

Anyway let’s get into today’s project. Today I’m sharing a 12x12 layout of me when I was in year 2. When I first opened the December 2018 kit, I saw the beautiful chipboard piece saying “bloom where you are planted” and I instantly knew I wanted to do a layout of myself from when I was younger. First I painted the chipboard piece with gesso and then I used some hot pink paint from my stash and went over the gesso with that.


Next I used some black paint from my stash and paint over the area that I knew my photo and the chipboard piece would cover. I used a really light layer and this only took a few minutes to dry. Next I used the papers from the kit and some tissue paper from my stash to matte my photo. I just used double sided tape to adhere the paper layers together. I also used the pink and white polka dot doily from the kit and added that to the photo matt. I adhered the photo down using wet glue and it was being stuck down to mixed media. I also used a black felt tip pen and did a simple border around the layout.


I knew I wanted a simple embellishment cluster so that the focus of the layout would be the chipboard title. I cut out a tag shape from one of the papers from the kit and used the back so that I would have a white coloured tag. I used some punched from my stash and cut out some circles and hearts and simply adhered these to the tag. I then using my hole punch, made a hole at the top of the tag and used one of the ribbon trims from the kit to put through the tag hole. I then used the resin flowers and paper flowers from the kit and stuck those down with some wet glue. Finally I used a few tiny word stickers from my stash on the tag and the layout was done.


I love how this layout has turned out and I love how much the title sticks out in the layout.


Thank you so much for reading this blog post, check out what the other ladies are doing with this kit on the blog. It has been wonderful being a design team member here at scrapping fun kits.
Thanks Jaymi

Saturday, 8 December 2018

Jaymilee - December 2018 - All Smiles


Hello lovely people,

I’m up on the blog today sharing an 8x8 layout of my dog Leo. I’ve been making a lot of layouts lately using paper and no mixed media which is very different from my normal style, but I’m really loving this change. I started by trimming down the three lightest paper from the kit to fit diagonally on my background paper. I also used the pink satin ribbon from the kit and trimmed that down to also fit on the background paper. I used some wet glue from my stash to adhere them down.


Next I used the black doily and one of the papers from the kit to add some paper layers to my photo. I just used some doubled sided tape to adhere the papers layers to the photo and then double sided tape again to adhere the photo down to the cardstock. I used some black thicker’s from my stash and a pen to write my title, All Smiles. I then used a felt tip pen to outline the cardstock. I did this so that there was another element of black on the layout.

I used a few pieces of ephemera from my stash to make an embellishment cluster on the bottom right hand side of the photo. I used the black and pink resin flowers from the kit to add some dimension to the layout. I also used some tiny work stickers from my stash in pink and black. Finally I used the pink paper flower from the stash on top of the black doily so that there was a little pink in the middle of the layout.


That’s all from me today. Stay tuned later in the month to see what else I make with this beautiful pink and black kit. Check out what the other ladies on the design team are doing with this kit on the blog.

Thanks,
Jaymi.

Wednesday, 28 November 2018

Jaymilee - Dino Kit - Birthday card / mini album


Hi everyone, Jaymilee with you Today.
I’m up on the blog today sharing something that is a little bit different that I created with the Dino Kit. My idea behind this project is a birthday card that can also be used as a mini album. So with this idea in mind I knew I needed a card base. I cut down some white cardstock from my stash to a card that had a trifold.


I covered the inside cover with sections of paper from the kit. I did this so that the person that receives the card could then use these sections to add photos. I also pinned on the dinosaur patch from the kit as both an embellishment and a gift for the person receiving the card.


Next I used the washi tape from the kit as well as the leaf trim from the kit to make a corner detail. I used hot glue to stick everything down to ensure that nothing would fall off. I then stuck on the really cute resin leaves from the kit to add some more detail to the cover.


To hold the card shut and when photos would be added I used the stretchy ribbon from the kit to make a closure for the card. I did this by trimming down the ribbon to the size I needed and simply used hot glue to attach the two ends together.

I used a green alcohol marker from my stash to write dinosaur dude across the detail on the front cover. I also added some of the dinosaur wooden buttons inside the card to go along with the dinosaur patch from the kit. This was a really fun project to make as it was super quick and something that a beginning crafter could make.


Check out some of the other ladies on the blog and what they made with this kit. That’s all from me this time.
Jaymi

Wednesday, 7 November 2018

Jaymilee - 8x8 Layout - Sharing is Caring


Hi everyone,
I’m up on the blog today sharing a really quick and simple 8x8 layout of my family’s dogs. 


I started by cutting down a 12x12 kraft cardstock down to 8x8. This kit was filled with green items and I have always struggled to make green layouts. I knew I wanted to do a little bit of mixed media in the background because I thought it would make working with green a little easier. I stared by putting some gesso on the right hand side. I used a sponge and dab it onto the page. Next I used a stencil from my stash that looks a little but like leaves. I just used some green paint and used the same sponge to dab on a tiny amount of green on top of the gesso.


Next I used the lined paper from the November kit and matted my photo. I also used a book page and a green sheet of paper from my stash to also matt the photo. I used some double sided tape to stick all the paper layers together. I then used some wet glue to stick the photo onto the layout. I always use wet glue when sticking anything onto mixed media.


While I was creating the mixed media background, I decided to use the title sharing is caring because they are both sharing a stick in the photo. I used an alcohol marker from my stash and a black felt tip pen to write the title. Writing your own title is a great way to get a unique title when you don’t have any alpha stickers that will go with your layout.


I used the washi tape from the kit and I covered a heart that I just cut from a scrap piece of paper. This is a great way to make coordinating embellishments if you don’t have any matching embellishments in your stash that go with a layout you are making I used some foam tape and wet glue to stick down the heart. I used the leaf brads from the kit and pushed them though the page in the top right hand corner and next to the heart I made. Next I used some twine from my stash and tied the two dinosaur charms on the twine. I really like how the charms still swing because the twine is glued down not the charms. Finally I used some green tiny word stickers form my stash and did some black splatters around the page.


That’s all from me today. Check out what the other ladies have created using this kit.
Thanks everyone,
Jaymi.


Wednesday, 17 October 2018

Jaymilee - October 2018 - A night out


Good morning lovely people, I’m up on the blog today sharing a 6x12 layout using the October 2018 kit. This month I really wanted to challenge myself to use a Christmas themed kit to make a non-Christmas layout. I just have to say this layout started off very different from the end result. So I challenged myself to use a few of the red elements from the kit.

I started with a pre-made mixed media background. To do this was just a red alcohol marker and some rubbing alcohol. Then I used the packaging technique to make a soft pops of colour on the white card-stock.
After starting the layout I knew that I wasn’t loving how the mixed media was looking, but again I challenged myself to use it. To do this I matted the photo with the papers from the kit, I used some double-sided tape to stick down the paper mats and then some double-sided tape to stick that to the background paper. Then I used the red twine from the kit and wrapped it around the bottom of my paper and stapled them down.


Next I used some die cuts from my stash to cover the little bit of mixed media down the bottom. I also used a pencil to sketch out my title. Using hand lettering on your layouts is a great way to add a title if you do not have any alphas that match your layout.


Next I used the red rhinestones from the kit to create a little ‘shelf’ for the title. I really like how this turned out, I think it pulls your eyes attention to the title. Finally I used some wood veneers and tiny resin starts from my stash to add little details around the page. And a little bit of gold splatters around the page.


Go check out all the other ladies lovely creations thismonth. That’s all from me today,
Thanks everyone,
Jaymi.

Saturday, 6 October 2018

Jaymilee - October 2018 Kit - 6x6 Christmas mini album

Hello lovely ladies, I’m up on the blog today sharing my first project using the October 2018 kit. For this first project I wanted to make a really simple Christmas album because I’m not doing December daily this year, but I still want a simple way to document my Christmas memories. I grabbed two 12x12 kraft cardstock sheets, two 12x12 white cardstock sheets and a few random green papers from my stash. I then cut down all the paper so they were all 6x6. I just arranged them in any order, but I knew I wanted kraft to be the first page.


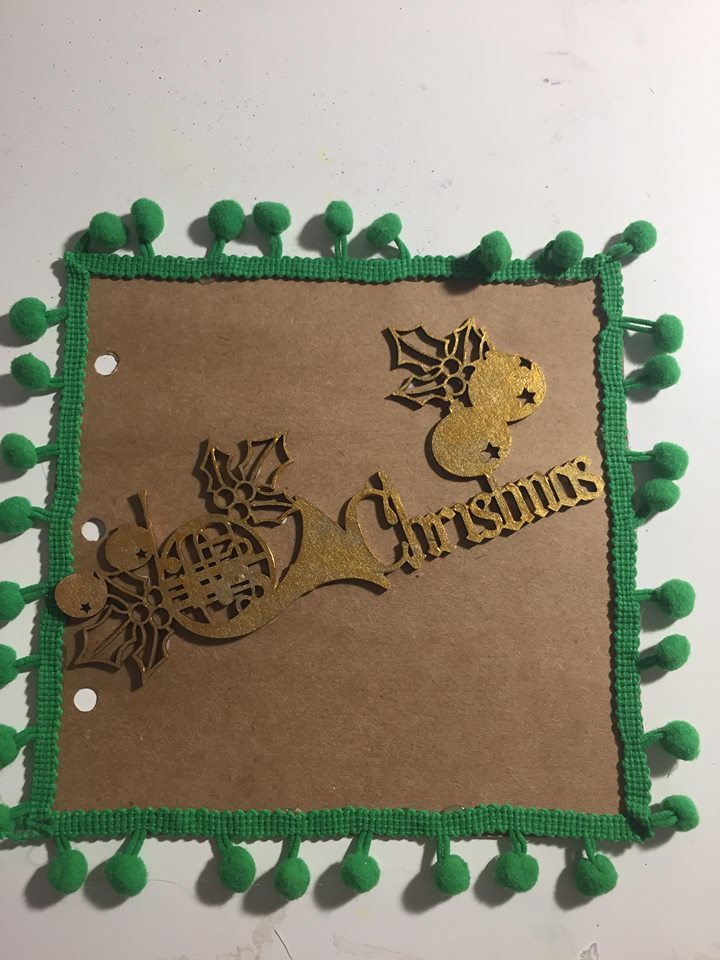
Next I used my hot glue gun to glue down the green pompom trim from the kit around the front cover of the mini album. This took a little bit of time but using a hot glue gun makes it so much easier then standard wet glue.


Next I took the chipboard Christmas word from the kit and painted it gold. This took a few coats but because they were very thin it dried very quickly. Painting chipboard or wood veneer can add a really nice textural element in a paper craft project. I then glued it down onto the front cover using wet glue.


I took the silver flower from the kit and hot glued that onto the middle binder ring of the mini album. I then took the red twine from the kit and tied little bows on the top and bottom binder rings. Adding different trims and ribbons to binder rings on mini albums can really add a little bit of softness to the metal binder rings.


Next I just went a little embellishment crazy over the cover. I hot glued the green fabric flowers from the kit on top of the green pompom trim. I also used the hot glue gun again to put the adorable little Santa hat on the top right corner of the album cover. I put a label from my stash and stamped on the December 2018. Finally I put some white splatters all over the page.

I’m really excited to fill this mini album with all the Christmas memories this year. I’m also so happy with how this mini album cover turned out, I haven’t made a mini album not in binder in 5 years so this was really fun to make. Go check out some of the other ladies projects using the October embellishmentkit.

Thanks everyone bye.


Saturday, 15 September 2018

Jaymilee - September 2018 Kit - Little Sun

Hello everyone, Jaymilee here. I’m up on the blog today sharing a really quick and easy 8x8 layout I created with the September 2018 Kit. 

Firstly I started out with the idea of using the cute little paper bag included in the kit as a matting piece for my photo as well as a place for a giant tag. I matted my photo with one of the papers from the kit and ripped the bottom off to give a little more texture. Next I used the paper bag from the kit and matted that making sure that I left the open end of the bag clear. I made a really simple tag using one of the papers from the kit as well as a white reinforcers from my stash. I used some grey twine from my stash and used that to make a pull for the tag.


Next I decided to use some grey paint from my stash and some bubble wrap that was just on my desk. Yes you did read that right bubble wrap. Bubble wrap is an amazing way to add texture really easily to a layout. I painted over the bubble wrap with the grey paint and just stamped that onto the paper.


I used double sided tape to stick down the photo to the background. Then I decided to use some black and gold alphas from my stash to create the title for this layout. I thought that this title goes really well with the theme of the kit which is very spring and sunflower inspired. Which fits perfectly as this little puppy is called sunny.  I used one of the labels from the cut-apart sheet and did a little journaling about the photo. If I had a lot more journaling I would have used the tag however for this layout I really wanted the tag as a design element rather than a practical element.


To finish off the layout I used two of the tiny words from the cut-apart sheet as well as one of the little wooden bees that was included in the kit. I thought these bees were just too cute to not include in the layout. Finally I added a gold heart from my stash as well as some gold mist splatters from a sparkly element and a border around the outside of the layout.

I really loved how this layout turned out. It was also really quick and only took me about 10 minutes to create. This is included the paint drying which is a really fast layout. Check out some of the other ladies and what they have created this month. That’s all from me using this kit.

Jaymilee

Saturday, 8 September 2018

Jaymilee - September 2018 Kit - Sweet as Sunshine

Hello everybody, Jaymilee here, I’m up on the blog today sharing my first project using the September 2018 kit. I have to start off by saying I was in love with this kit. I love yellow as a colour to scrap with and grey is a beautiful natural colour which accents yellow beautifully. I’m sharing today an 8.5 x 11 layout of my dog Leo. I started out with this layout by lining up all the trims and washi tape. I also cut open the straw included in the kit and put that with the washi and ribbon. I glued them using hot glue because it dries quickly and I think its easier to use then wet glue with this background technique. I cut sections of the grey ribbon so that I could use it multiple times.


Next I just matted my photo with black tissue paper and an old book page from my stash. Then I drew a little border around the outside of the whole layout using a black felt tip ben. I love using borders on layouts as I feel it ties the whole layout together and focuses your eyes onto the layout as a whole.


I used a black pen from my stash to write the title of the layout as well as some gold thickers from my stash. I love how the kit this month included some tiny word cut-outs. I had to use them on this layout. I also used the little resin sunflower from the kit.  Just some wood veneer and stickers from my stash.

To finish it off I used some gold mist spray and just splattered them where the clusters and the title are. Finally I used a stamp from my stash and did a full ink stamp and a ghost stamp. I loved how this layout turned out.

Check out some of the lovely ladies on the design team and their projects using this months kit. 

If you would like to have one of this month's gorgeous kits head to the Subscription Tab and fill in the form :)

That’s all from me today.

Jaymilee.

Saturday, 18 August 2018

Jaymilee - August 2018 Kit - Let's go fly a kit Art Journal spread

Hey everybody Jaymi here, I’m up on the blog today sharing an art journal page that was both inspired by and used things from the Augustembellishment kit. I started with the idea of making an art journal layout based around the song ‘let’s go fly a kite’ from you guessed Mary Poppins. 

Firstly I used some just watercolours from my stash and did a gradient from green on the bottom to a light blue on the top. By using water colour this is really easy as they blend together very well. Next I just went online and found a template of an outline of a father and a child flying a kite and traced it to make the outline of the people. I water to do this as I really wanted the main colour to come from the kites in the sky.


Next I cut out the kite die cut from the kit this month as well as the little kites from one of the papers in this month’s kit. I picked the big kit to connect with the people arms as I wanted it to be the centre of attention with the kites. I glued these down using matt gel medium, you could use any wet glue on water colour as it doesn’t create that much texture. I added some black lines from the kite using a black pen and some little details on the string of the kites.


Next I just wrote out the little quote ‘let’s go fly a kite’ using a black pen and in my script font. I do love how it turned out. If you are not confident in doing this with a pen straight away do it in pencil and go over that with your pen it makes things a lot easier.


Finally I used my black pen again to add the little trees on the ground. This was really simple to do and I think it added a really nice effect to the page and brought the whole layout together.


That’s all from me today, I hope you enjoyed my art journal page. Check out some of the other ladies projects using the August embellishmentkit.

Jaymi.

Friday, 10 August 2018

Jaymilee - August 2018 kit - May project life page

Hey everyone. I’m up on the blog today sharing a project life spread using the amazing August embellishment kit. This kit was Mary Poppins themed and I was so excited to use it, Mary Poppins was one of my favourite movies growing up. I do monthly project life and a 9 x 12 format. Project life is a great way to scrap memories fast I find.

The great thing about project life and scrapping in general is you can do whatever you want. I know I wouldn’t have enough photos and also space at home or the time to do a weekly project life so I choose monthly. For this spread I thought it couldn’t be anymore fitting to use the kit for the month it was announced I was on this spread I thought it couldn’t be anymore fitting to use the kit for the month it was announced I was on this design team, May.

First thing I did was put in my photos and cut out two 3x4 size pieces from the paper included in the kit. I have predominantly my cards at the start of the year just using some journal cards from the reject store and my script font. I also included a ticket from a movie I saw this month. First thing I did was use double sided tape to glue down the photos to the cards I had.


The next thing I did was I wanted to create a little journal card. I used some little gold alpha stickers from my stash and just added a flower and a border around the outside. I knew I wanted a full journal card this month to document about my anniversary.

Next I wanted to add a little embellishment to the card with the painting picture. I stapled on the little flower piece from the kit and also a label from my stash.

The last thing I did was I created a little pep through section in one of the pockets. This month I didn't have enough photos to make a whole spread so I thought it would be a cool idea to use the cityscape die cut to create a little see through element. First I just cut it down to three inch and just put that straight into the pocket. I added a little pink glitter from my stash and just sealed the pocket with some tape measure washi from my stash. I choose this washi because I thought the colours worked amazing with the glitter but also because Mary Poppins uses her measure tape in the movie.


I'm really happy with how this project life layout turned out. it was also really quick and took me about 20 minutes all up. that's all from me today I hope you enjoyed this page and stay tuned for some more projects using this kit.
Jaymilee


Saturday, 21 July 2018

Jaymilee - July 2018 Kit - TN layout


Hello lovely people, I’m up on the blog today sharing a quick and simple layout in my Traveler’s Notebook using the July 2018 Harry Potter Kit. 
First I matted my photo using paper from the kit, I love using paper to matt photos in a TN spread because it draws your attention to the photo. Next I positioned the photos on the page and stuck them down with double sided tape. I find using wet glue in my TN makes the pages warp a little so I tend to stick with double sided tape. Next I just cut out a heart from the left over paper from the kit, then I punched out a circle using a punch. I just stuck down a little heart sticker and my little cluster was done.


I love having little pockets of journaling throughout a TN layout. So I just found areas on the page that I knew I wanted some journaling and wrote them just using a black pen from my stash. I loved the train washi that was included in the kit, I was a little stuck on how to use it and just thought to stick it down. A great thing about TN spreads I find is that I don’t mind if everything is perfect and matches I just stick down what I want and have my memories recorded. I just finished off the page with some little embellishment where they could fit. A page like this is a great way to use all the little scrap pieces of paper and left over embellishments because you are working with such a small space.
That’s all from me today. I hope you liked seeing a simple and quick TN spread. Check out some of the others ladies projects using the July Harry Potter inspired kit.

Jaymilee

Monday, 16 July 2018

Jaymille -Winter Moodboard - tea solves everything

Hey Everyone,
I’m up on the blog today sharing my art journal spread, inspired by the Winter Moodboard. From the moodboard I took the purple tones and the mug. Two of my favourite things are the colour purple and a hot cup of tea so this moodboard was a great inspiration.

First I started by drawing the girl on the left hand side of the page. I knew i wanted a quote, a girl holding some tea and of course. I sketched out the girl using an image I found just on google. This is a great way to draw images if you aren’t confident in drawing them from scratch or don’t have any stamps or stencils. Then I used some dylusions ink. The one used is called laid back lilac. I sprayed some water on the page then the ink. I only sprayed the ink once because I wanted a lot of white space. I used some water colour to paint the girl and then traced around her with black pen.


I used a star stencil from my stash and mixed together some purple and blue paint to get this beautiful colour. Next thing was to find my quote and write it out. After I found my quote I wrote it in pencil first and then went over it with a black pen.


Finally I used a gold paint pen and a purple pen to add some crosses around the page for a some little details. This layout was super simple to make and only took about 30 minutes including drawing the girl.


Check out some of the other design team members layouts using the Winter Moodboard. Hope you enjoyed mine.
Jaymilee

Friday, 6 July 2018

Jaymilee - July 2018 Kit - Magic

Hey lovely peeps, I'm up today on the blog sharing a 9x12 layout I created using the July embellishment kit. The layout I created I wanted to focus on the word magic rather than the theme of harry potter. What I did was break off the deathly hallows symbol from the wood veener. I know it was scary to break the piece like this but I was a little thrown on how to use the piece and this was a way I knew I could use it. Next I traced around it to create a template that I used for the background.


 What I did was cut triangles of the same size from the papers in the kit. Next I cut out a few blank triangles which I then covered with the washi tape included in the kit and a design team bonus.
I places all the triangles on the page randomly in a strip down the left side of the page. All I did was make sure that the same pattern wasn’t next to each other, and I just stuck them down with double sided tape, you could also use wet glue to glue them down.

You can use this technique with any shapes and it will give an awesome effect.

I just used some gold tissue paper and kraft cardstock from my stash to mat the photo. I didn’t want to take away from the background I created but I wanted a little something to make the photo pop and gold worked really well for that.


Next I just hand cut a heart from the papers in the kit, you can also use a punch or die to do this is you aren’t confident in doing this freehand. I glued that down along with the birdcage charm from the kit to make a little embellishment clusters at the bottom ride side of the photo.
Using the theme of magic I came up with the title your friendship is magic. I used some gold thickers from my stash. and just wrote the rest of the title in my own script font. also added a little cluster on the side using the paper flower from the kit and gold heart and arrows from my stash.

I hope you all enjoyed this layout. I love how it turned out. Don't be afraid to alter your embellishments to suit what you need them for.
Jaymilee.