Showing posts with label Raelene. Show all posts

Saturday, 8 June 2019

Raelene - June 2019 Kit - Sleepy Mini Album

I wanted to make a quick mini album with the papers in the June 2019 Kit so I had some fun watching a few quick mini album videos on YouTube and decided I would go with a Wallet Mini Album that My Sister's Scrapper shared in 2016, as I feel like it could be used as a really cool card as well as a gift.

I selected some cream cardstock as my base to pull in the cream components in the kit and followed her instructions, gluing my fold out pieces with Helmar Acid Free Glue.


I adhered magents with Helmar 450 Quick Dry Adhesive before adding my papers with Helmar Acid Free Glue.

To decorate my top flap at the front I added the cream trim from the kit with Helmar 450 Quick Dry Adhesive, folding the ends around to the back.  I then added the Sleepy die cut as my title and created a little cluster with 3 of the flowers in the kit and the last button that I had left over from doing the bay album for my friend that I shared the other day.


When covering the back of the top flap I added to layers of cardstock between the trim so when my paper went down it would sit fairly flat.

I adhered all layers down with Helmar Acid Free Glue.

I added some white cardstock to represent where photos could go and added the elephant papers to the other sections.


I love how it turned out.


If you would like to order one of these kits head to the Subscription Tab and fill in the form.

Wednesday, 29 May 2019

Raelene - May 2019 Kit - Hope

Today I have the second layout I created during my latest Tilt Train trip.  This time it is a 8x8.  I went with 8x8 as I was only taking a small suitcase for our clothes and a backpack for all our other supplies needed on the trip so I could not take a 12x12 background, 8x8 meant I could get this layout scrapped and if need be add it to a 12x12 background paper layout.

For this layout I took the Hope wood veneer that is in the Scrapping Fun Kits May 2019 Awareness Kit that Jodi from Corbett Creations created for the kit along with a assortment of Yellow supplies from Scrapping Fun Kits September 2018 kit and from some old D-lish Scraps from a friend when she was destashing.


 I started by tearing my papers and then I decided to use the half of the paper bag from the September 2018 Kit that I had with me as a journalling pocket behind my photo and layers so I sealed the cut side with my Helmar Acid Free Glue and adhered it down.


Here is the opening of the bag.


I created a little cluster next to my Corbett Creations wood veneer with a crochet piece from the September 2018 kit and a flower and tag from D-lish Scraps that I received in the destash bundle I bought.


I finished off my layout by inking the edge with some Distress Ink in Mustard Seed.


I love how my layout turned out.
If you would like to order a kit head to the Subscription Tab and fill in the form.  Enter May into the promo code box,

Saturday, 18 May 2019

Raelene - May 2019 Awareness Kit - Harmony Day

I decided to pack the flat items from the May 2019 Awareness kit to take with me on the Tilt Train so I could get some special Awareness Day photos scrapped on my journey. 
I do love TN scrapping and 8x8 scrapping for occupying my time while I travel on the Tilt Train, you can see some of my posts about this Here.

I had forgotten that I had taken the scissors out of my travel pencil case so this layout and the 8x8 I created which I will share with you in my next post are featuring paper tearing.  Silly me but I love how the layouts turned out.  Thankfully I had pre-cut my photos and some white cardstock to use as mats.


I added some other flat orange items to my train stash for this trip so that I would have some options for building layers and embellishing when scrapping my Harmony Day photo.  I had forgotten to print the other photo needed for this spread so I went with a single page layout on the right hand page of a spread and I will do another layout with the same supplies on the left page when I get my second photo printed.

I brought my favourite Helmar glues on this trip as I would need them for the 8x8 layout so I adhered my layers and photo down with Helmar Acid Free Glue. 

I picked out 2 papers that worked well with my photo and tore them to a size that would suit.  I even tore a little section out from the middle where it would be hidden behind the photo.  I used this on the bottom right corner.    Adding a sticker from a old sticker sheet I scored at a destash to this cluster.
This cluster formed a perfect base to add the year to my layout.


I then added Harmony Day to the top right corner to balance things out.


And my layout was done.  I love how it turned out.

If you would like to order one of these kits please head to the Subscription Tab and fill out the form, enter May in the promo code box so I know which kit you would like to order.

Saturday, 27 April 2019

Raelene - April 2019 Kit - ANZAC

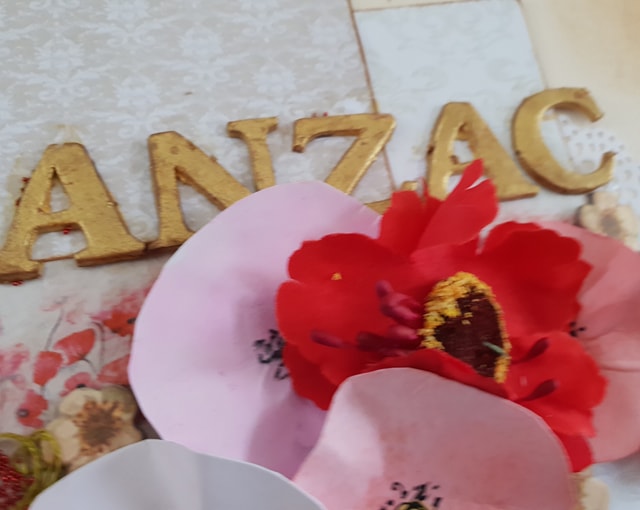
Last year on ANZAC Day the boys and I spent the day exploring the Discovering ANZACs website and reading all the documents about my Grandfather and my Grandmother's brother, I really wanted to scrapbook these important stories from our family history but I just didn't have enough suitable supplies so I made some Watercolour Poppies that day and then started work on creating a ANZAC inspired kit. 


I scrapped the photo my Great-grandmother sent Grandad while he was stationed in France during WW1 earlier this month and on ANZAC Day I spent some quality scrapping time scrapping the restored photo of Grandad from WW1.

I started by aging my cream cardstock with Distress Ink in Antique Linen and Vintage Photo, I also edged all my paper layers and my photos with Vintage Photo.


I started by playing with my papers until I was happy with my layers, trimming out any paper that would be behind things and adhering them together with Helmar Acid Free Glue.  When sticking them down I didn't glue to the edge so that I could tuck things in later.
I wound up tucking in some Fundamentals white paper doilies later as once my embellishments were going down it felt like it needed it.

I stepped a little further outside my comfort zone and created a big field of poppies with all my Watercolour Poppies, the fabric and resin poppies from the kit and the poppy washi from the kit.  I usually don't do a cluster of flowers this big but I do love my poppy field.


I started by sticking down some of the poppy washi and then sticking down all my watercolour poppies.  I then added my poppies and the leaf die cuts from the kit.
And finally added 2 wood veneer clock faces and some chipboard flowers and swirls from a old pack of Basic Grey chipboard.

For my title I grabbed out the letters for ANZAC from some Ruby Rock-It chipboard alphas and painted them with some gold paint. 
Once dry I inked them with Distress Ink in Vintage Photo to create a more brass look.


I added some scraps from a vintage crochet doily to my layout with Helmar 450 Quick Dry Adhesive (I used this for the wood veneer clocks and the resin flowers also) and some green embroidery thread. 
I placed a piece of the vintage doily in my top left cluster and into my main cluster, carefully poking it under flowers so it looked like it belonged in the cluster rather than being added as a after thought.


I added some Ruby Rock-It red micro beads to my cluster by just dabbing a little Helmar 450 Quick Dry Adhesive in random spots.


I added some paper scraps and washi to my top left and bottom right corners to draw your eye.

 I was so worried while I was building this layout as I do not usually do a big flower cluster but I absolutely love how it turned out.

Wednesday, 10 April 2019

Raelene - April 2019 kit - Message from home

Ever since I attended my first scrapbooking class one of the most important things I planned to scrap the heritage photos and in particular I wanted to tell the 2 ANZAC stories in my family.

So when creating this ANZAC inspired kit for my business Scrapping Fun Kits I thought about what I needed to tell the story of my Granddad and my Grandmother's brother.
For this layout I am scrapping a copy of the front and back of the photo my Granddad's Mother sent him when he was serving in France, dated 22/2/1917.  This is the only photo in existence of his Mum and the only example of her hand writing so it is very special and I am so glad I was able to get a scanned copy on a visit to my then 88 year old Uncle in 2009.  I was going to include the photo of my Granddad but changed my mind during the creation process.


I wanted to create a aged paper look with my cardstock so I started with a sheet of cream cardstock and created the aged feel with Distress Ink in Old Paper, Antique Linen and Vintage Photo using the packaging technique on my craft sheet and then some ink blending to finish to accomplish this.
I then sealed it with Helmar Chrystal Kote to ensure if it got wet I  wouldn't have my ink run.


I then grabbed out the lace from my August 2018 Mary Poppins inspired Kit from Scrapping Fun Kits and aged it with some Distress Ink Aged Linen, I just dabbed it several times on my craft sheet, spritzed with water and then smooshed my lace in it.

To put my layout together I used 3 papers from the kit and selectively cut the papers so I could save the paper that would be behind the photos.
I matted my photos with cream cardstock and inked the edges of the photos and the photo matts with Distress Ink Vintage Photo.
Adhering all my layers with Helmar Professional Acid Free Glue.


I put down a strip of the washi from the April 2019 ANZAC Kit, then adhered my lace using Helmar 450 Quick Dry Adhesive.
Once this was down I glued my photo cluster down with Helmar Professional Acid Free Glue and then started adding the charms and 2 of the die cuts from the ANZAC Kit.
I used Helmar 450 Quick Dry Adhesive to adhere the charms and Helmar Acid Free Glue to adhere the die cuts.


I decided to just put my Great-Grandmother's name as my Title so I grabbed out some really old Kaszazz alphas that look like handwriting and spelt out her name, I chose this as I wanted it to work in with her hand writing.
As I was sticking it down I realised I was putting down her maiden name so added her surname but I was out of y and s  so I had to make them by cutting other letters and numbers up.  I created the y with a u and the bottom of a 3 and the s were created with the bottom of a 3 and top of a 2. 
I think they look pretty good.


Scrapping family heritage photos can be really hard but I am really happy with how this turned out.

Saturday, 9 March 2019

Raelene - March 2019 Kit - Happy Times

I haven't added Easter photos into my journal from 2017 yet so I decided to do a standard TN sized layout that I can tape in as a tip in to my journal for that year for my next layout using the March 2019 Kit.

I used some of the tiny scraps I tore while making my Easter's On It's Way layout and tucked one in behind my photo and placed the other 2 in corners.  To add another layer behind my photo I added a small scrap of torn purple cardstock behind it.


For my embellishment I added the teal bunny from the cut apart and some of the washi from the kit.

I finished it off with the tiny word from the word cut apart that says Happy Times and journalled briefly about the photo.


I love how it turned out and can't wait to add it into my journal.

Wednesday, 6 March 2019

Raelene - March Kit - Easter's On It's Way

I had some photos of the boys preparing treats for our Easter celebration in 2017 that I really wanted to get scrapped but one of them the lighting angle has affected the quality so I knew it needed a darker background than the usual spring themed Easter supplies provide so this Autumn Easter themed kit was perfect for getting these scrapped.

I love the torn paper look on layouts but I often forget to do it when I am speed scrapping so for this layout instead of pre-cutting my papers into smaller scraps ready to use when layers I took inspiration from Julie's layout and tore 2 thin strips off each paper, 1 of each I tore into smaller pieces for my corner clusters.

I matted my photos with a scrap of Kraft Cardstock and glued my layers and photos down with Helmar Acid Free Glue.

For my embellishments I decided on the eggs from the cut apart and some stickers from 2 Echo Park Easter themed sticker sheets; this year's Easter wishes and last year's Hello Easter.  I pulled in some chocolate bunnies, eggs and a cute chicken and Easter bunny from the stickers to build my embellishment clusters.
For the tiny eggs I cut them from a border strip from the Easter Wishes sticker sheet. 


When cutting the pieces of sticker away I noticed the waste piece between this border strip and the one above it and thought it would be a cute extra layer in my papers so I cut some off to add to my paper layers.  When adding it I carefully peeled back my papers a little and just sort of poke it in so the white was under the papers and just the colours were showing I then glued the edge of my papers back down with Helmar Acid Free Glue.


I used a tiny word sticker from the Echo Park stickers and added the Easter Eggs tiny word from the word sheet I just trimmed the outline off so they looked like they were meant to be together.


I finished my layout off with the year and a doodly boarder.  And then I decided to move a sticker so my date looks like it is floating but I still love my layout I just have to decide what to add next to the date.


There are still a couple of these kits available so if you would love one of these kits head to the Subscription Tab and fill in the form.  :)

Wednesday, 27 February 2019

Raelene - Alice Kit - It's Time For A Magical Journey

Hi Scrapping Fun fans, Raelene with you Today and I am scrapping the left over photos from my We're All Mad Here layout for the Scrap the Girls November 2017 Challenge entry.   The video for this layout is now up on my channel, you can find it here.

I grabbed out some extra bits in addition to my remaining Alice kit; these included Echo Park Alice in Wonderland 6x6 paper pad and Echo Park Alice in Wonderland Chipboard Accents.


I started with the mixed media paper from the Alice Kit as the teal colour on the paper matched the Mad Hatter in my photo's coat so well so I knew I wanted that paper behind that photo.
I then started playing with papers from my Echo Park 6x6 Alice in Wonderland paper pad and the check paper from the kit to build my paper layers.

Once they were all glued down I decided it needed some of the gorgeous character washi so I added it in just slightly tucked under the papers on each side (so glad I hadn't glued all the way to the edge at this point).


I then played with my embellishments.  Starting with the sample of purple lace as it was a perfect layer to tuck under the Alice photo.

I then added my mini Cheshire Cat Tail by tucking the top under my photos, which meant my photo needed to be popped up so I carefully peeled it up and then cut bits of the chipboard stickers waste to go under my photo matte and added Helmar Liquid Scrap Dots in as well to give it some good but adjustable lift.


Now that the tail and photo were how they should be I set about adding the final bits to finish it all off.  I added a quote from the Chipboard Accents using Helmar Liquid Scrap Dots under the left hand side to give it the right amount of lift on that side (you can see how it is popped up in the photo of the paper layers under the Mad Hatter photo).
I then added the bottle and mushroom chipboard but they didn't want to stick so I used some Helmar 450 Quick Dry Adhesive to help them stick.
I built a mini scene with the catapillar to get him to sit right I added some chipboard scrap under the top section and glued him to the mushrooms and the layout with Helmar 450 Quick Dry Adhesive.
Next I added the key, mouse and little butterflies and finished off with a doodly boarder and my journalling.  I am really happy with how the layout turned out.

If you would like to get your hands on one of these kits there are a couple left so just head to the Subscription Tab and fill in the form and enter Alice into the promo code field so I know it is this kit you want. 
Happy Scrappin!

Saturday, 2 February 2019

Raelene - Alice Kit - We're All Mad Here

I am fortunate that I can use kits in advance so I used my Alice kit for my entry into Scrap the Girls November 2017 Challenge as it was the perfect prompt to combine with this kit and my photos from cosplaying the Cheshire Cat at last year's FraserPop Festival.  So today I wanted to share with you the details of how this layout came together.


I decided to use the chipboard from the kit and paint it with my Vicki Boutin pink paint and Dina Wakley eggplant paint, I decided to give it a think coat and they use it like a stamp on my background.  I created the background with the left over paint by doing the packaging technique with it and then stamping my still wet chipboard onto the cardstock.  I love the effect this gave my background and how it affected the finished paint on the chipboard.


I decided to layer my chipboard onto the blue satin flower but that meant the top would be higher than the bottom so I used Helmar Scrap Dots along the bottom to lift it up to the same height as the top.  They were the perfect way to get the perfect height.


As the top of my chipboard was sitting on the flower the bottom needed to be raised, I used Helmar Liquid Scrap Dots to do this.  They are perfect for something like this as you can adjust the height they are giving you  quiet easily.


I then added the mini cards and the bottle charm to create a whimsical cluster.  

I then added some washi to the top left and bottom right corners and wrote my titles on the washi but sort of going off it a bit.
I added a piece into my main cluster/photo area to pull it all together.


Once everything was dry I realised I forgot to use the tail and my plan all along had been to make that a feature of this layout, oh well I will save it for the next layout.


I love how this layout turned out, it is perfect for recording the fun I had.

If you would love one of our Alice Kits head to the Subscription Tab and fill in the form.

Saturday, 26 January 2019

Raelene - Gaming Kit - Level Up

Hi Scrapping Fun Kits fans today I wanted to share the layout I created with the Gaming kit.
I just played with my supplies and photos, so I don't have photos of how things came together as this scrap session was just about playing but I wanted to share with you what I did and how it turned out.

I used Katie's tip for the stickers but I didn't leave the white border.

You can just see some of the paper that is behind the photo on the right.  I loved that paper so much that I wanted a big piece  showing but once everything was down it felt like it was just floating so instead it became a background piece and I do love it.


I decided to go around the level up with a black pen to see how that effect would look.  I like it.

The cherry resin peice was the perfect addition to my title.
I placed some strips of 2 of the papers in the top left and bottom right corners of the layout and finished the layout off with a doodly border.
I started by matting my big photo with the Tetric styled paper, I cut the middle out so I could use the remainder on other projects.
I then built layers with the star paper, mario type paper and the red doily (I cut the doily in half so it could go in 2 places).
Once everything was stuck down I added some journaling about the memories these photos show.


This layout was quick to come together as the kit works so well together.  I hope this post has inspired you to create, if you wish to share what you create please head to the Scrapping Fun Inspiration Group and add it to the Gaming Kit ablum.

If you would love one of our Gaming Kits and haven't bought one yet there are still a couple left so just head to the Subscription Tab and fill in the form.  Enter the word Gaming into the promo box so I know that is the kit you would like.

Sunday, 6 January 2019

Raelene - DD2018 Kit - Documenting December Catching Up

This year for my DD I was returning to what worked best for me, combining my DD with my journal the way I did in 2016 but this time I had my photos printed at the shop instead of on my $30 dodgy home printer and that impacted my staying  on track as I struggled to get to the shop to print and I would get home, sit down to scrap and find I had missed a photo. 
Today is January 6th and I just got my missing photo for December 1st and December 4th printed on Friday so I am hoping to sit down and finish my DD over the next couple of days.  I did however skip ahead and got a few days done so I wanted to share one of them with you Today.  I haven't used much of the DD 2018 kit as since I am combining it with my journal it is mostly using memorbilia until Christmas, when I get my Christmas Day memories in I will use the DD 2018 kit.

For December 8th to the 11th I had only one photo and a small amount of journaling so inspired by a spread Shay did that used frames and numbers for a list of days she had no memories she wanted to put in her DD I created pockets with some frame and added my journaling to tags.

The red and white striped frame and numbers are from the cut apart that is in the DD 2018 Kit.


I always like to include some of the wrapping paper I am using each year somewhere in my DD, so I used it as my background for this spread and it coordinated so well with the frame and numbers from the cut apart..
As my photo had purple in it I matted it on some purple and then pulled purple in by creating some tags with it and using the bottlebrush stickers from the November 2017 Kit onto to of the pockets to pull it all together.  For the twine for the tags I grabbed out the silver and white twine from the January 2018 Kit, it was perfect.
Other bits in my layout are some frames I got from Morgyn, a tag I got from Shay and some scrap Christmas Music paper I had in my stash.

I love how this spread turned out.

I will be back soon with more layouts for you.

How is your DD going?

Saturday, 5 January 2019

Raelene - Gaming Kit - Wiggles Card

My Granddaughter's 2nd Birthday Party was Wiggles themed so I just had to make her a Wiggles card.  I decided on a pop up box card with the current characters but I needed a fun background paper.  The yellow paper with brightly coloured stars from the Gaming Kit was the perfect background paper for a Wiggles themed card.


I created my base from a A4 sheet of red cardstock from my stash.  I scored it not quiet half way along the width so that I had 1 side that was 4 inches and 1 side that was 4 1/4 inches.  I then turned it 90 degrees and along the length I scored it at 1/2 inch and then every 2 3/4 inches.

I then cut the 1/2 x 4 inch section away and cut along each of the 4 inch lines.
I glued the 1/2 inch tab inside to form a box.

I used some scraps to make 3 internal pieces which I cut to 3 3/4 inches long and scored a half inch on each side.  I folded the 1/2 to a right angle and glued them in with Helmar Acid Free Glue.


For the characters you could fussy cut them from packaging or wrapping paper, etc, whatever you have or if you have a Silhouette you could use the Pixscan to cut them for you.


I cut my star paper into two 2 5/8 inch lengths of paper and then cut one of these into 2 3 3/4 inch piece and the other into a 4 3/4 inch piece so it would go down into the card a little; which left a scrap that was too short to fully cover the front panel but that was fine as I was covering the top of that panel with the Wiggles sign anyway.

I added a red glitter number 2 from my stash to the front and called this card done.  I love how it turned out, so simple but so effective.


I love how the card turned out and I can't wait to see Miss E's face when I give it to her.